When I first got my Garmin Forerunner 245, I knew it had navigation features. However, I didn’t really understand how they worked.
After using the watch for a while, I’ve come to understand these features – and to really love them. I don’t need them on the daily basis, but they’ve come in very handy. They’re especially useful when I’m traveling or running new trails.
If you’re trying to figure out how navigation on your Forerunner works – or you’re in the market for a watch and this might be a feature you’re interested in – let me break down how it works.
What Navigation Features Does a Mid-Tier Garmin Forerunner Have?
The mid-tier, 2XX Garmin Forerunners (265, 255, 245) all have basic navigation features on them. The higher end Garmin 9XX have some additional features, including fully featured maps, but I’m not going to focus on that here.
If you look at the feature list of the Garmin Forerunner 265, it includes four navigation features:
- Point to point navigation
- Bread crumb trail in real time
- Back to start
- TracBack
I’ll go over each of these features below.
Note that these features are one of the differentiation points between the entry level Forerunner 55 and the mid-tier 2XX’s. If you’re choosing between a 55 and a 265, here’s a more in depth comparison.
How Point to Point Navigation Works
With point to point navigation, your Garmin Forerunner combines its built-in compass with your current location and a set of saved coordinates to keep you running in the right direction.
Typically, the way this works is that you pick a course to run when you start an activity. That could be a course that you’ve created yourself, either through Garmin Connect or another mapping tool. Or it could be a GPX file that you downloaded from the internet.
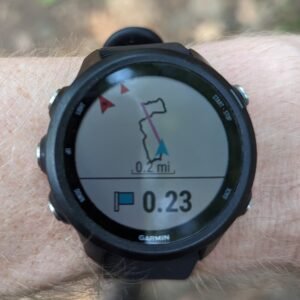
Once you start the activity, if you’re looking at the navigation screen on your watch, you’ll see a line that portrays the course itself. Your progress along the course will be colored in as you go. A red arrow will point in the direction you’re supposed to run, and if you go off course your watch will buzz to alert you. Depending on how the course was made, you may also get some alerts to upcoming turns and changes in direction.
Another screen on your watch will tell you how much distance you have left to go and what your estimated finish time is. No matter what screen you flip to, you’ll still see the red arrow. So you can watch your heart rate or lap pace and still know which direction you’re supposed to go.
This is a great tool for following complex routes. Perhaps you’re snaking through unfamiliar city streets or tackling a new trail that includes a lot of intersections. I recently used this to follow a trail through Baltimore, and I wrote a post about it here.
How Bread Crumb Trail in Real Time Works

The bread crumb trail in real time feature is one that I use quite often.
The way this works is that your route is automatically tracked and drawn onto a navigation screen as you go. You won’t see any detail in the map, but you can easily make out what direction you’ve gone and where you are relative to that route.
By default, I think this navigation screen appears when you start a Trail Run activity. But under “Settings” for the Run activity, you can edit the data screens and add navigation as one of the available screens.
I find this to be really helpful when I’m on an unfamiliar route and I’m not sure if I’m going the right way. Maybe I’m running down a parallel street, and I can flip to the bread crumb to see how far I am from my original route. Or if I’m making a loop, I can see how far it is back to the start.
By default, this screen is zoomed in so you’ll only see about a quarter mile in any direction. But if you hold the “Up” button down, you’ll get an options menu. Select “Pan/Zoom,” and you can zoom the map out. You can also scroll around so that you’re not centered on your location. For a longer run, this could be very helpful to re-orient yourself if you happen to get turned around.
I spend a lot of time traveling and running in new cities, so I’m quite often running on new streets and new trails. I don’t always take the time to create a course, unless I think a particular route is going to be very complicated. Usually, I look at the map, know which way I’m headed, and then I trust that I’ll be able to find my way back home with the bread crumb trail.
How Back to Start Works

When you use the Back to Start feature, your Garmin Forerunner will guide you back to the starting point of your activity.
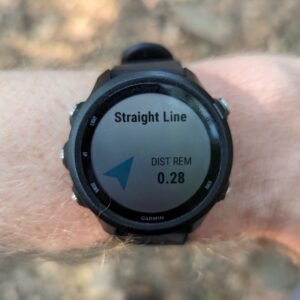
Hold the “Up” button to open up the settings menu, and select Navigation. Select “Back to Start” and then select “Straight Line.”
A new data screen will appear with a big arrow pointing you back to the start as well as the remaining distance. Note that this distance is as the crow flies, so if you need to make a bunch of turns along the way it might underestimate things. It’s also of limited use if you’re on a complex trail structure with lots of potential turns.
Like with navigating a course, if you change the data screen to look at something else the red arrow will still appear on the perimeter of your screen. So you’ll always be pointed in the right direction.
But this is really useful when you know that the streets or trails will get you to where you’re going, as long as you go in the right direction. Recently, I was running in south Jersey (Vineland). Everything there is a long, flat road. They mostly go east-west and north-south in a pretty clean grid. I got turned around, but I knew that if I headed south and east, I’d eventually land on the road that would get me back to where I started.
Using the Back to Start feature gave me the confidence that I was heading in the right direction, and when I got on the last road that took me directly back I could estimate the remaining distance. I had started out using the bread crumb trail to try to orient myself, but my route was too long and strung out. Back to Start was much more effective in this situation.
How TracBack Works
When you try to navigate back to the start of an activity, the other option besides “Straight Line” is “BacTrack.”
This option is similar, but instead of pointing you towards the origin point it points you towards your route. It takes the bread crumb that was created while you were running and then runs it in reverse.
A similar data screen will appear showing the direction you should go and the distance back to the origin, but it also includes a distance from the route. If you stray from the route, you’ll get an alert and your watch will vibrate. The arrow will then point back towards the route – not towards the origin.
If you’re off route for a while, the distance remaining will also be off. I think your watch assumes you’re going to turn around, trace your steps back to the route, and continue from there. But if you merge back onto the route further on, the distance will be recalculated.
I tested this feature this morning on my morning run. I did a 4 mile out and back on my local trail. Shortly after turning around at the 2 mile point, I selected the BacTrack option.
At first, it wanted me to turn around and retrace my steps to the turnaround point. But I kept going straight – following the path I knew would take me back the way I came – and it recognized me as being on track pretty quickly. Towards the end, I took a parallel trail. Within about ten seconds of going off trail, I got an alert. The arrow kept pointing towards the original trail until I merged back into it. It worked perfectly.
If you’re doing a big loop, this isn’t going to work out well. But if you’re trying to retrace your steps – even if you aren’t going to do so exactly – TracBack will help you find your way back to the starting point of your run.
Do You Need Navigation On Your Run?
For me, this is a must have feature on my Garmin Forerunner. I used to run with my phone, so I could whip it out and check the GPS if I got turned around. But now, I usually go out with nothing but the watch on my wrist.
Even without the fully featured maps of the Garmin 965, I can rely on the basic navigation features of my 245 to get me home. It’s helped me explore many a park, trail, and city. I’ve been turned around more than once, and using the bread crumb, back to start, or TracBack feature, I’ve gotten home safely.
If you never go off exploring new locations, this might not be important to you. But for me it’s a huge selling point for the mid-tier Garmin Forerunners. Again, if you’re trying to figure out which one to get take a look at this comparison of the Garmin 245, 255, and 265.
Has the navigation feature helped you out a jam? Leave a comment below.
